Night photography is part of most travel experiences for which most people are unprepared. How do you get sharp, clear photos in the dark?
Location: The Australian Outback
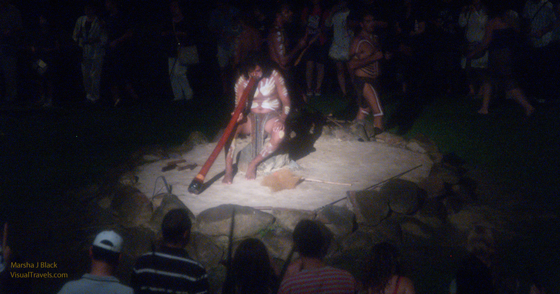
My husband and I were in the Australian Outback, watching a night presentation of Aboriginal cultural dances and ceremonies. The show began with sounds from the didgeridoo. We were sitting up high and back a little from the stage area. Our positioning allowed me to view the whole scene and think about the light.
Challenge: Night Photography
Night photography isn’t on most traveler’s list of things to do. Yet, with a little knowledge, night photography can be easy and rewarding. How do you photograph the action and the setting at night? Flash photography here was out of the question. Besides being ineffective because of the distance, the flash would have disturbed everyone else present.
Accidental Photographer Tip:
Night photography is easiest when the main subject is brightly lit. Fortunately at this event the spotlight was on the action. I turned off the flash (you can find the setting either in your menu or on the back of your camera). Then I found the ISO settings, which control the light sensitivity of the digital flash card. Increasing the light sensitivity increases the shutter speed which increases the probability that the photo will be sharp.
To set the ISO for a high sensitivity level I moved to the 800 ISO setting. The higher the number, the more light sensitivity is present in the flash card. Then I pushed my telephoto out to the maximum and aimed it at the light so the internal light meter in the camera would set itself for the light that illuminated the main subject. I held the half way down to hold the setting and moved the camera to frame the shot. The result is the photo above.
The light sensitivity reading was high enough to cause the camera to set a fast shutter speed so the final photo was sharp. The fast shutter speed froze the action. There was enough light on the people surrounding the presentation to give a good sense of what was going on. The internal light meter in the camera read the light on the demonstration, so that stood out.
In order to do this, you need to find three topics in your camera manual and learn how to use them:
1, Find the icon settings and then choose one that will give you a fast shutter speed, such as sports or portrait.
2. Find the telephoto controls so you can narrow the field of view.
3. Fine the ISO controls in the menu options and choose one with a high number.
For simple tips to improve your photography on the go or on your travels with any camera or smartphone, check out my book, The Accidental Photographer for the Camera Bag.
For those of you interested in getting a more technical foundation, I recommend taking the courses at New York Institute of Photography. These are online correspondence courses with assignments reviewed by professional photographers.
Leave a Reply