Location: Lassen National Park
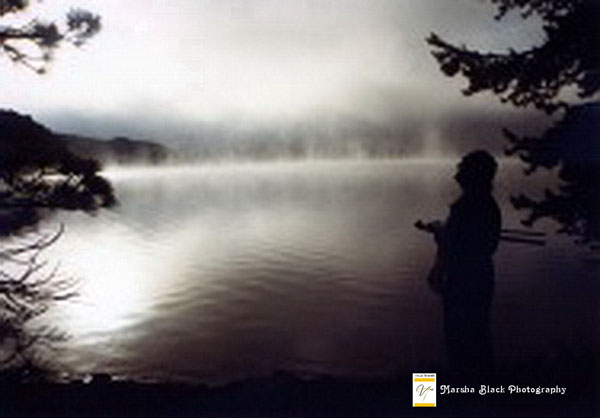
Photographing fog and mist was only one of the incredible challenges nature provided us one morning.https://roadtrippers.com/stories/lassen-volcanic-national-park?lat=40.80972&lng=-96.67528&z=5 On one of several trips to Lassen National Park, my husband and I went on an overnight backpacking trip to see part of the interior of this great National Park that wasn’t accessible by car. Snag Lake was our overnight destination. The next morning, we grabbed our cameras and walked down to the lake to take in the view and let the crisp mountain air wake us up. Mist was rising off the lake as the sun warmed its surface, creating a mystical morning scene.
Challenge: Photographing fog and mist
Photographing fog and mist as it rises off warming surfaces of the earth is one of the more challenging projects. either the mist doesn’t have enough detail, or the surface that it is rising from, or there isn’t enough interest around the area to frame and set it off. In the case of Snag Lake, the surrounding trees provided a natural frame. The challenge was getting a point of view that made them clear and also showed the background against the far side of the lake to give some deminsion to the final image.
Accidental Photographer
I saw the rising mist off the lake as my husband walked from the campsite down to the edge of the water. I took a few steps back and surveyed the image in front of me. He had stopped by one of the trees to get a wide angle view of the lake. I told him to stay put, and took my reading off the mist rising against the mountains and trees in the background, hoping to get enough detail of the lake to show the mist as well as silhouette the darker parts of the scene. I took this when film was the option, so I had to use an exposure strategy that blended the exposure readings of the mountains in the background with the light from the rising mist. I had learned how to do this in an introductory class I took from the shop that sold me the camera, and this was one of my first practice shots. The technique involved taking a reading off the darker area in the background and then off the light areas of the mist, and then averaging the two and setting the readings by hand. Today, with digital and the ability to check each shot, I would find a neutral grey area to take the reading and shoot, adjusting subsequent shots until I had the affect I wanted. I wanted my husband in the shot. I felt his presence would add interest and character and deminsion the lake itself.
My averaging strategy worked, but I didn’t find out how well until I got home and had the film developed. This trip was in 1983, long before digital cameras were even in the development process. I still have the enlargement of this print on my wall.
Remember, no matter how simple or complex the camera, it is just a light box. The lens lets the light from the scene into the box and records it on the light sensitive mechanism in the camera. In 1983, the light sensitive mechanism was film. Today, for most people who grab a camera, it is an electronic chip or disk. It doesn’t really matter which you use. The basic principles of light management are the same.
For simple tips to improve your photography on the go or on your travels with any camera or smart phone, check out my book, The Accidental Photographer for the Camera Bag.
For those of you interested in getting a more technical foundation, I recommend taking the courses at New York Institute of Photography. These are online correspondence courses with assignments reviewed by professional photographers.
So fascinating Marsha. This is breathtaking
thanks Gwen. I am glad you like the photos and hope you find the tips helpful